Pi-Hole is a custom DNS server mainly used to block advertisements. Once installed, it acts as the standard DNS server for the whole network and you don’t need to configure any adblock plugin on your devices.
Pi-Hole will be the default DNS server on the network but we will not use its DHCP capabilities. The goal is to keep the original Dnsmasq instance for DHCP and as an upstream server for DNS resolution. This way, it’s easier to revert to a configuration without Pi-Hole with few changes.
Pi-Hole configuration
Start by creating a docker-compose.yml file with the following content
$ export PASSWORD=password
$ export HOST_IP4=192.168.1.2
$ export HOST_IP6=2404:e801:xxxx:xxxx::1681:2

$ mkdir /opt/docker/pihole && cd /opt/docker/pihole
$ tee docker-compose.yml > /dev/null << EOF
version: "3"

services:
  pihole:
    container_name: pihole
    image: pihole/pihole:latest
    ports:
      - 53:53/udp
      - 53:53/tcp
      - 60080:80/tcp # To remove if you use Nginx as a proxy (part6)
    environment:
      - TZ=Asia/Singapore
      - WEBPASSWORD=${PASSWORD}
      - DNS1=172.17.0.1#5353
      - DNS2=no
      - ServerIP=${HOST_IP4}
      - ServerIPv6=${HOST_IP6}
    volumes:
      - ./config/pihole/:/etc/pihole/
      - ./config/dnsmasq.d/:/etc/dnsmasq.d/
    dns:
      - 127.0.0.1 # Required for local names resolution
      - 1.1.1.1 # Required during startup when Pi-Hole is not fully started
    restart: unless-stopped

networks:
  default:
    external:
      name: br0
EOF

$ chmod o-r docker-compose.yml
Update the Dnsmasq’s host configuration to listen on port 5353 instead of 53. If at any point, we need to remove Pi-Hole, the only setting to revert is this port option.
$ sudo sed -i -e 's/^port=53$/^port=5353$/g' /etc/dnsmasq.d/main.conf
Restart Dnsmasq and starts the Pi-Hole container
$ sudo systemctl restart dnsmasq
$ docker-compose up -d

-- Check the logs to ensure Pi-Hole is started properly
$ docker-compose logs -f
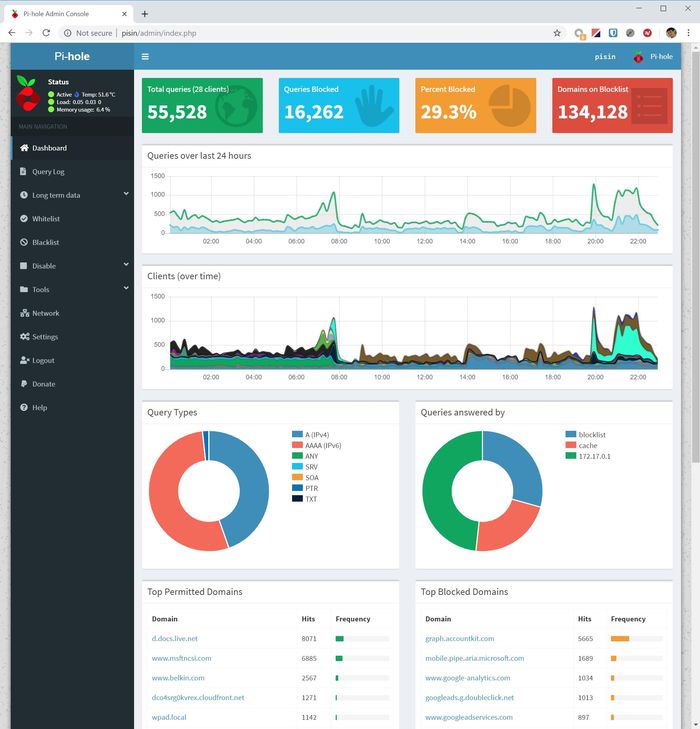
Once started, You can access the Pi-Hole administration on http://pi.hole:60080/admin/
IPv6 hostnames discovery
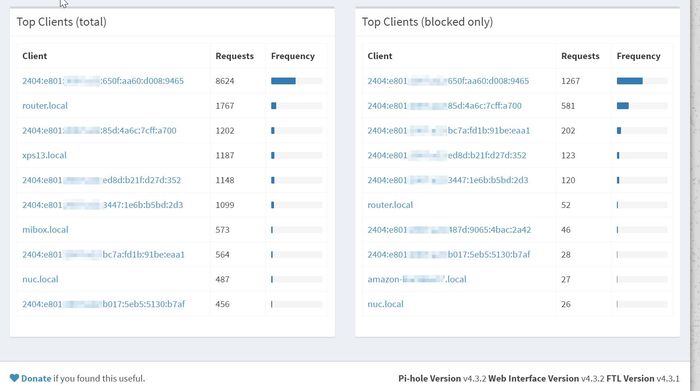
You may notice most of the IPv6 addresses used by the clients are not resolved in Pi-Hole. The reason is the clients prefer to use a temporary generated IP instead of the one assigned by the DHCPv6 server. This behavior is called IPv6 Privacy extensions and is enabled by default on almost all operating systems.
It’s really useful to resolve the names to identify quickly the clients so I ended up with a kind of hack. When a client joins the network, it requests an IP to the DHCPv4 server and Dnsmasq stores the MAC address, the assigned IP and the hostname in a leases file. At the same time, the client creates several IPv6 addresses and sends a Neighbor Solicitation message for the configuration. Using tcpdump, I monitor this kind of message and when a NS is received, I try to find a client hostname matching the MAC address in the Dnsmasq leases file. Then I create a host file with the IPv6 addresses and the guessed hostnames (I append -6 suffix to the hostnames to avoid any collision with the original Dnsmasq leases file).
The script will run in a Docker container so it’s easier to control and manage it. The code is available on GitHub https://github.com/gpailler/snifipv6
This script can be tested with the following command line:
$ wget https://github.com/gpailler/snifipv6/raw/master/ipv6-to-hosts.sh
$ sudo tcpdump -i eth0 -e -n 'ip6[40]=135 and src host ::' -l | \
>  bash ipv6-to-hosts.sh \
>  /var/lib/misc/dnsmasq.leases \
>  /tmp/hosts-test
When executing the command above, the output looks like:
Using source '/var/lib/misc/dnsmasq.leases' and output '/tmp/hosts-test'
tcpdump: verbose output suppressed, use -v or -vv for full protocol decode
listening on eth0, link-type EN10MB (Ethernet), capture size 262144 bytes
Received packet: 21:19:53.701324 40:33:1a:f3:0c:31 > 33:33:ff:e6:97:44, ethertype IPv6 (0x86dd), length 86: :: > ff02::1:ffe6:9744: ICMP6, neighbor solicitation, who has 2404:e801:xxxx:xxxx:c7f:b47b:5be6:9744, length 32
Wait 3 seconds
Found MAC=40:33:1a:f3:0c:31 and IPv6=2404:e801:xxxx:xxxx:c7f:b47b:5be6:9744
Found matching hostname: GregoiresiPhone
Adding lease file '/tmp/hosts-test/GregoiresiPhone-6_2404:e801:xxxx:xxxx:c7f:b47b:5be6:9744'
To use the Docker image, create a docker-compose.yml file
$ mkdir /opt/docker/snifipv6 && cd /opt/docker/snifipv6
$ tee docker-compose.yml > /dev/null << EOF
version: "3"

services:
  snifipv6:
    container_name: snifipv6
    image: gpailler/snifipv6:latest
    volumes:
      - /var/lib/misc/dnsmasq.leases:/data/in/leases_source:ro
      - ./hosts/:/data/out/
    network_mode: host
    restart: unless-stopped
EOF

$ docker-compose up -d
And finally, update the Dnsmasq configuration to use this new hosts file. With the hostsdir option, Dnsmasq will detect the changes in the file and will update the hosts records dynamically.
$ echo "hostsdir=/opt/docker/snifipv6/hosts" | sudo tee -a /etc/dnsmasq.d/main.conf
$ sudo systemctl restart dnsmasq
Once everything is done, we can add a cron task to remove files older than 30 days and restart DnsMasq once a month.
4 4 1 * * sudo find /opt/docker/snifipv6/hosts/* -mtime +30 -delete && sudo systemctl restart dnsmasq