My Internet provider, StarHub, offers a nice 1 Gbps broadband access with full IPv4 and IPv6 support and a Linksys EA EA8100 router. The router options are basic but it will fit my needs for a home network.
From here, there are two options:
- Keeping the DHCP server on the router and providing only a custom DNS server.
- Providing full DHCP and DNS services from the Raspberry Pi.
Dnsmasq configuration for IPv4 and IPv6 DNS only
From my experience, keeping the DHCP and the routing on the router allows me to break everything on the Raspberry Pi while my family continues to enjoy the Internet and it helps to avoid screams, headaches, and divorce (yes it can escalate quickly ![]() ).
).
Dnsmasq configuration
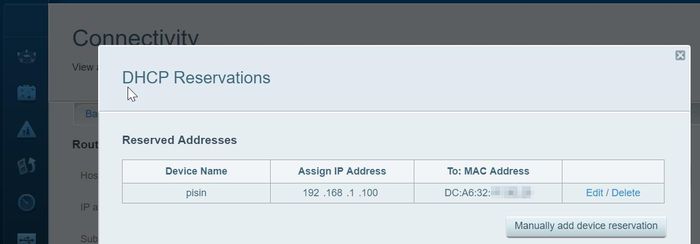
Start by adding a DHCP reservation for the Pi (192.168.1.100)
Install dnsmasq and configure it to forward DNS queries to CloudFlare and Google DNS.
$ sudo apt install dnsmasq

$ sudo tee /etc/dnsmasq.d/main.conf > /dev/null << "EOF"
# Listen on this standard DNS port
port=53

# Never forward plain names (without a dot or domain part)
domain-needed

# Never forward addresses in the non-routed address spaces.
bogus-priv

# Don't read /etc/hosts file
no-hosts

# Don't read /etc/resolv.conf or any other file.
# Use only the configuration provided by this file.
no-resolv

# Don't poll changes from external files (like /etc/resolv.conf)
no-poll

# Upstream DNS servers
server=2606:4700:4700::1001
server=2001:4860:4860::8844
server=1.1.1.1
server=8.8.8.8

# Force the upstream servers to be used in order
strict-order

# Increase the cachesize
cache-size=1500

# Don't store in cache the invalid resolutions
no-negcache

# Fake domain to test the configuration
address=/testdomain.tld/1.2.3.4
EOF

$ sudo systemctl restart dnsmasq
Finally, on the router, assign the static DNS with the Raspberry Pi address.
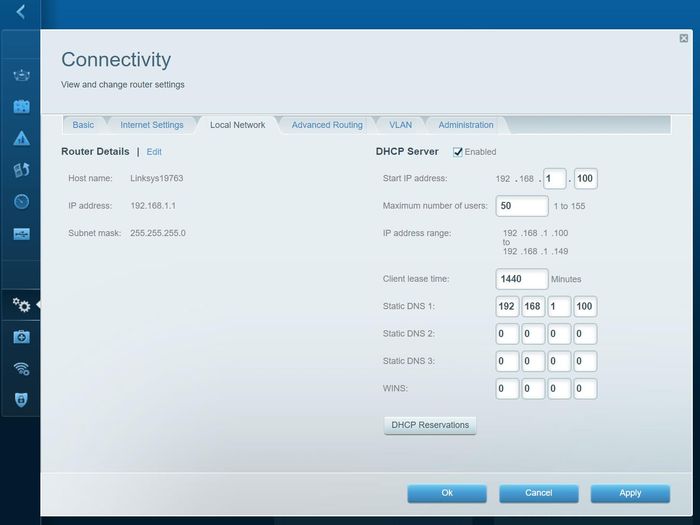
Now you can renew the DHCP lease on a client to retrieve the updated configuration. With my Linksys router, I noticed the DNS is still pointing to the router IP but now, the DNS query should be received by the router and forwarded to the Dnsmasq DNS server.
Test
Let’s check that the test domain is properly resolved to confirm we’re using the Dnsmasq DNS server.
$ sudo apt install dnsutils

-- Check using IPv4
$ dig @192.168.1.1 testdomain.tld A +short
1.2.3.4

-- Check using IPv6
$ dig @2404:e801:XXXX:XXXX:3223:3ff:fec1:5796 testdomain.tld A +short
1.2.3.4
Dnsmasq configuration for DHCPv4 and stateful DHCPv6
In some situations, you want to run your DHCP server for IPv4 and IPv6 to get full control of your network. For IPv4, it’s straight forward but for IPv6, you have to know some differences.
With IPv6, the clients don’t need a DHCP server to retrieve an IP address. The most common configuration mode is called stateless configuration. A router on the network sends Router Advertisement (RA) messages with network prefixes and routes and each client generates one or several IPv6 addresses using the provided prefix. The addresses can be random or pseudo-random (based on the MAC for instance). The router can also send the DNS (RDNSS) configuration in the Router Advertisement messages.
Checking IPv6 RA message
Install radvdump to retrieve and check the IPv6 RA messages.
$ sudo apt install radvdump

$ sudo radvdump
[After few seconds]
#
# radvd configuration generated by radvdump 2.17
# based on Router Advertisement from fe80::3223:3ff:fec1:5796
# received by interface eth0
#

interface eth0
{
        AdvSendAdvert on;
        # Note: {Min,Max}RtrAdvInterval cannot be obtained with radvdump
        AdvManagedFlag off;
        AdvOtherConfigFlag on;
        AdvReachableTime 0;
        AdvRetransTimer 0;
        AdvCurHopLimit 64;
        AdvDefaultLifetime 1800;
        AdvHomeAgentFlag off;
        AdvDefaultPreference medium;
        AdvLinkMTU 1500;
        AdvSourceLLAddress on;

        prefix 2404:e801:XXXX:XXXX::/64
        {
                AdvValidLifetime 100858;
                AdvPreferredLifetime 100858;
                AdvOnLink on;
                AdvAutonomous on;
                AdvRouterAddr off;
        }; # End of prefix definition


        route 2404:e801:XXXX:XXXX::/64
        {
                AdvRoutePreference high;
                AdvRouteLifetime 172800;
        }; # End of route definition


        RDNSS 2404:e801:XXXX:XXXX:3223:3ff:fec1:5796
        {
                AdvRDNSSLifetime 300;
        }; # End of RDNSS definition

}; # End of interface definition
Static IP configuration
Based on the prefix 2404:e801:XXXX:XXXX found in the radvdump output above, You can assign static IPv4 and IPv6 addresses to the Raspberry Pi. Once done, reboot to ensure the configuration is properly applied.
$ sudo nano /etc/dhcpcd.conf
[SNIP]
interface eth0
static ip_address=192.168.1.2/24
static ip6_address=2404:e801:XXXX:XXXX::1681:2/64
static routers=192.168.1.1
static domain_name_servers=127.0.0.1
Dnsmasq configuration
On my Linksys router, it’s not possible to disable or modify the RA messages but I noticed the flag AdvOtherConfigFlag is on in the radvdump output above. It means the clients will generate their IPv6 addresses but will request additional configuration on the network.
Let’s configure Dnsmasq as a DHCPv6 server to provide additional IP and DNS configuration.
$ sudo apt install dnsmasq

$ sudo tee /etc/dnsmasq.d/main.conf > /dev/null << "EOF"
# Listen on this standard DNS port
port=53

# Never forward plain names (without a dot or domain part)
domain-needed

# Never forward addresses in the non-routed address spaces.
bogus-priv

# Don't read /etc/hosts file
no-hosts

# Don't read /etc/resolv.conf or any other file.
# Use only the configuration provided by this file.
no-resolv

# Don't poll changes from external files (like /etc/resolv.conf)
no-poll

# Upstream DNS servers
server=2606:4700:4700::1001
server=2001:4860:4860::8844
server=1.1.1.1
server=8.8.8.8

# Force the upstream servers to be used in order
strict-order

# Set the domain for dnsmasq
domain=local

# Add local-only domains here, queries in these domains are answered
# from /etc/hosts or DHCP only.
local=/local/

# Automatically add local domain to simple names
expand-hosts

# IPv4 range
dhcp-range=192.168.1.50,192.168.1.150,255.255.255.0,12h

# IPv4 DNS server
dhcp-option=option:dns-server,192.168.1.2

# IPv4 gateway
dhcp-option=option:router,192.168.1.1

# IPv6 range
# - The prefix is retrieved from eth0 interface (constructor:eth0 option)
# - Details about the available options:
#   https://weirdfellow.wordpress.com/2014/09/05/dhcpv6-and-ra-with-dnsmasq/
# - 'ra-names,slaac' means Dnsmasq tries to guess the auto-configured IPv6 address and send a new address + DNS configuration
#
dhcp-range=::1681:ff,::1681:ffff,constructor:eth0,ra-names,slaac,12h

# IPv6 DNS server
dhcp-option=option6:dns-server,[2404:e801:XXXX:XXXX::1681:2]

# Ask client to poll for option changes every six hours
dhcp-option=option6:information-refresh-time,6h

# Mark created RA with high priority and specify 0 for router lifetime
# to specify the Dnsmasq address should not be used as a gateway
ra-param=eth0,high,0,0

# Don't fill the logs with RA related messages
quiet-ra

# Set the DHCP server to authoritative mode to speed up leases acquisition.
dhcp-authoritative

# Enable DHCPv4 Rapid Commit
dhcp-rapid-commit

# Increase the cachesize
cache-size=1500

# Don't store in cache the invalid resolutions
no-negcache

# Fake domain to test the configuration
address=/testdomain.tld/1.2.3.4
EOF

$ sudo systemctl restart dnsmasq
As soon as Dnsmasq is restarted, Deactivate the DHCP server on the router.
IPv6 forwarding
I noticed that some clients (iOS for example) are not following the ra-param setting and use the Dnsmasq IP as the default gateway. The workaround is to activate IPv6 forwarding on the Raspberry Pi to properly forward IPv6 packets.
$ sudo sed -i 's/^#net.ipv6.conf.all.forwarding=1$/net.ipv6.conf.all.forwarding=1/g' /etc/sysctl.conf
$ sudo sysctl -p
Test
To test the configuration, Renew the lease on a client machine and check that the IPv4 and IPv6 configurations are properly applied. You can also check the fake domain testdomain.tld is properly resolved.
Depending of your OS and the IPv6 stack implementation, you can notice 2 IPv6 DNS servers are registered on the client. It can happen because the router and the Raspberry Pi are both sending RA messages but according to the RFC 6106, the DNS information from the DHCP should take precedence over the RA from the router.
Bonus / Tweaks
Avoid auto IP assignment
You may notice the Raspberry Pi will retrieve a IPv6 from the DHCP server. To force Dnsmasq to ignore the IPv6 requests from the Raspberry Pi, you can add the following line to the configuration:
$ echo "dhcp-host=id:$(cat /var/lib/dhcpcd5/duid),ignore" | sudo tee -a /etc/dnsmasq.d/main.conf
Additional hosts file
It’s always useful to have a nice name resolution for the local clients. It’s handled automatically by Dnsmasq for the clients registered through DHCP but not for the clients using a static IP. You can add a custom hosts file to customize the resolution for these hosts.
$ echo "addn-hosts=/etc/dnsmasq-static-hosts" | sudo tee -a /etc/dnsmasq.d/main.conf
$ sudo tee /etc/dnsmasq-hosts > /dev/null << "EOF"
# Router
192.168.1.1 router

# Raspberry Pi
192.168.1.2 pisin
2404:e801:xxxx:xxxx::1681:2 pisin
EOF

$ sudo systemctl restart dnsmasq